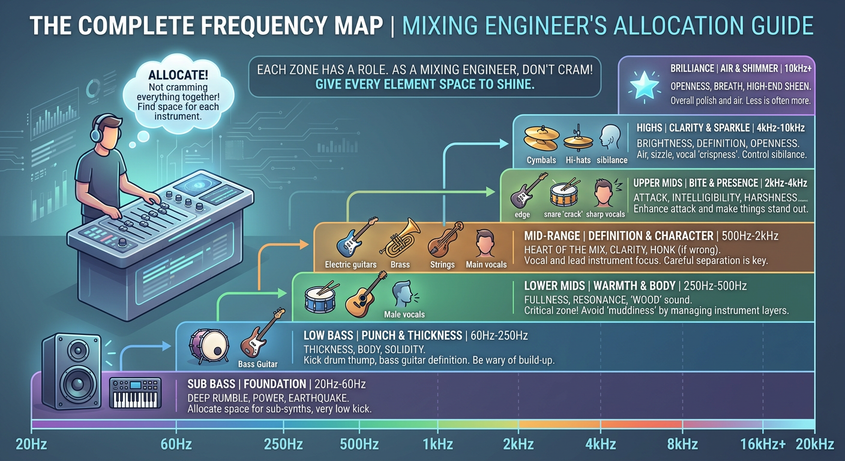
EQ is not a tone control. It's a space management system. Most amateur EQ work treats it like a paint brush — sculpting tonal character on individual tracks. Professional EQ work uses it to create room — allocating frequency space so each element can breathe.
The mental shift here matters more than any specific technique. Once you stop asking "how do I make this kick sound better?" and start asking "where does this kick live in the frequency spectrum, and what's competing with it?", every EQ decision gets cleaner.
The diagnostic mindset
Before I touch an EQ control, I answer one question: what is the specific problem I'm trying to solve? Vague descriptions don't help. Specific symptoms have specific diagnoses.
- "The mix sounds muddy" usually means excess energy between 200 Hz and 400 Hz, building up across multiple tracks at once.
- "The vocal is getting lost" usually means competition from guitars or keys in the 1–3 kHz presence range.
- "The mix is harsh" usually means accumulated energy in the 4–8 kHz range across too many elements.
If you can't name the problem, you're not ready to apply the solution. Get specific first.
Subtractive EQ first. Remove the problems before you enhance the features. If you find yourself making large boosts on individual tracks, you almost certainly didn't cut enough first. Less than 2 dB boosts, large enough cuts — that's the professional approach.
High-pass filtering: the headroom saver
The first move on most tracks: a high-pass filter. Use it on every non-bass element — guitars, vocals, piano, strings, synth pads, cymbals, room mics, anything that isn't supposed to carry low end. The HPF removes content below a set point: rumble, room noise, microphone handling, and unnecessary sub-energy that wastes headroom and muddies the bottom of the mix.
To set an HPF correctly: sweep it up gradually until you hear the sound start to thin out, then pull it back slightly until the fullness returns. The correct setting sits just below the point where the character of the instrument starts to change. For male vocals, that's typically around 80–100 Hz. Female vocals, 100–150 Hz. Acoustic guitars, 80–120 Hz. Cymbals and room mics can usually be HPF'd much higher — 200–300 Hz — without losing anything important.
Search and destroy: taming resonances
Once the low-end junk is filtered out, the next move is finding and removing resonances — those specific frequencies on a track that ring or honk or boost unnaturally because of the instrument or the recording space.
The technique: boost a narrow band (high Q) by 8–10 dB on your EQ and slowly sweep it across the spectrum from 100 Hz to 10 kHz. When you hit an unpleasant frequency, you'll know — it'll jump out aggressively. Stop sweeping, note the frequency, and then apply a cut at that frequency. Make the cut narrow (high Q again) and the magnitude equal to or smaller than the boost was.
The goal here isn't to make the sound better. The goal is to make it neutral — to remove the things that don't belong. The beauty of this technique is that once you remove the resonances, the underlying sound is usually much closer to "right" than you expected.
Clearing the mud zone: 200–400 Hz
The 200–400 Hz range is where the most spectral competition happens in any dense mix. Every instrument with a body — guitars, piano, vocals, drums — has significant energy in this region. When you stack many tracks together, the energies accumulate and the mix gets muddy.
The fix: apply wide, gentle cuts in this range on supporting tracks (rhythm guitars, piano, pads, backing vocals). Two or three dB cuts on multiple tracks usually does more than a 6 dB cut on one. The goal is to create space for the bass and the lead vocal to occupy the frequency real estate they need.
Additive EQ: the creative polish
Once the spectral competition has been reduced, additive EQ can enhance desirable characteristics — but use it sparingly. Wide Q for boosts, narrow Q only for targeted cuts. The boost on a vocal at 10 kHz for "air" should be a gentle 1–2 dB with a wide bell, not a surgical 6 dB spike.
The ducking cut: spectral mapping
Here's a move that took me years to learn properly. To make your lead vocal shine at 2.5 kHz, you don't boost the vocal. You cut the rhythm guitars and synths at 2.5 kHz — creating a gap that the vocal steps into naturally.
This requires less processing on the lead element (which means less artifacts, less unnatural character) and produces a much cleaner, more natural result than the alternative of boosting the vocal harder to compete. It's also how professional mixes maintain that effortless quality where every element is clearly audible without anything sounding aggressively processed.
The bottom line
Less is more with EQ. A mix that needs 6 EQ moves across 30 tracks is almost always cleaner than one that needs 20 moves. Maximum clarity with minimum intervention is the professional standard.
If you take one thing from this chapter: cut before you boost. Find the resonances and remove them. Clear the mud zone on supporting tracks to give your foundation and your lead element room to breathe. Don't reach for additive EQ until subtractive EQ has done its work first.
This is one chapter of The Professional Audio Mixing Blueprint
The full book covers 12 chapters — monitoring, gain staging, EQ, compression, reverb and delay, automation, psychoacoustics, modulation and saturation, mixing for genre, and the complete diagnostic protocol I use on every session. Available now on Amazon.