Eighty percent of a great mix is fader balance. The rest is detail. Get the underlying structure right and the polishing is straightforward. Get the structure wrong and no amount of plugin processing will save you.
This chapter covers the three things that make up that underlying structure: gain staging (managing levels through your signal chain), fader balance (the actual relative volumes of your elements), and phase (whether your tracks are working with each other or against each other). All three have to be right before EQ, compression, or effects work makes sense.
Gain staging: the headroom system
Gain staging is the management of signal level at every point in your signal chain — from the input gain on the channel, through any plugins, to the bus, to the mix bus, to the master output. It's the most common technical error in amateur mixes, and it causes more downstream damage than almost any other mistake.
The rule is simple: every track in your session should average somewhere between -18 and -12 dBFS RMS before any plugin processes it. This is the headroom range most professional plugins are designed to work within. Hit a vintage-modelled compressor with a signal averaging -6 dBFS and you'll get harsh, unmusical compression. Hit it at -15 dBFS and it sounds the way the designer intended.
Set your input gain or channel trim before any plugin so tracks average -18 to -12 dBFS. Use your fader for balance, not as a gain control. Most modern DAWs have a "clip gain" or "track trim" function that does this — it adjusts the audio before the channel strip rather than after.
Your mix bus ceiling
The final stereo output of your mix — before any mastering happens — should peak no higher than -6 dBFS. Ideally keep peaks at -10 dBFS or lower. This headroom is the working room your mastering engineer needs. A mix bus hitting 0 dBFS is a mix bus the mastering engineer literally cannot work with — there's nowhere for them to add level, no room for their compression or EQ moves.
Never apply a limiter or maximiser to your mix bus before sending for mastering. Deliver headroom, not loudness. That's how the professional handoff works.
Fader balance: the 80% mix
A professional mix is often described as being "80 percent fader balance." I'd put it higher — closer to 90. A well-balanced mix with no plugin processing at all sounds more professional than a heavily-processed mix with poor balance. I've heard it proven on countless reference recordings.
Decide the hierarchy first
Before I touch a single fader on a new session, I ask: what's the most important element in this song? Almost always it's the lead vocal or the primary melodic instrument. Every other element exists to support and frame that central element. If you can't articulate that hierarchy in one sentence, you're not ready to start mixing.
The 10-minute balance
Here's the process I use to set the initial balance on every mix:
- Bring all faders down to negative infinity, not unity.
- Start with the foundational rhythmic elements — kick drum, snare, bass.
- Add the primary melodic element — lead vocal or lead instrument.
- Fill in supporting elements — rhythm guitars, keys, backing vocals.
- Add ambient elements last — overheads, room mics, reverb returns.
Do this in ten minutes or less. Your freshest perspective at the start of a session is your most objective. Once you've set the balance, write down the fader positions so you can get back to them if you drift later.
Panning for space and clarity
A few principles I treat as rules. Kick, snare, bass, and lead vocal must sit dead centre — these carry the power of the mix, and centring them keeps the mono image strong. Rhythm guitars, backing vocals, and percussive supporting elements pan to the sides. Pan in complementary pairs for symmetry — if you pan one guitar 60 percent left, pan its counterpart 60 percent right.
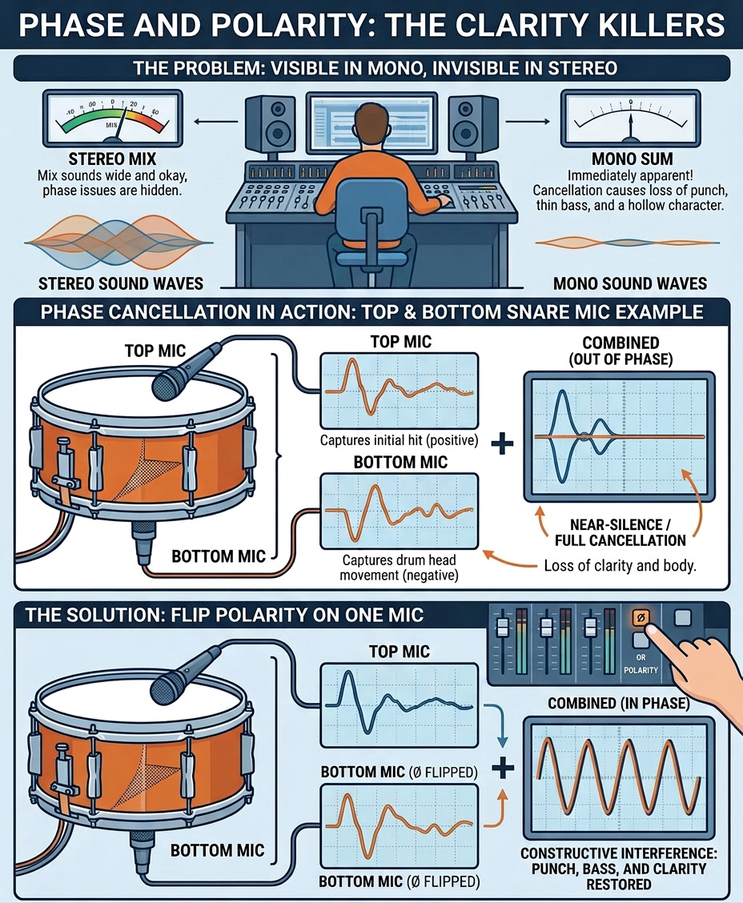
Phase and polarity: the clarity killers
Phase and polarity issues cause loss of punch, thin bass, and a hollow character that no EQ or compression can fix. They're often invisible in stereo and become immediately apparent the moment you switch to mono. This is one of the strongest arguments for the mono check — it's how you find phase problems before they ship.
When phase happens
Phase issues happen any time the same source is captured by more than one microphone. The classic examples:
- Snare top and bottom mics. Sound hits the top mic milliseconds before the bottom mic, so combining them without flipping polarity creates partial cancellation.
- Kick in and kick out mics. Same principle — different distances mean different arrival times.
- Guitar cabinet with multiple mics. Combining two mics at different distances from the speaker cone always creates phase relationships that need attention.
- Overhead and tom close mics. The overhead picks up the toms too, but later than the close mic — phase issues across the kit.
How to fix it
The process is mechanical:
- Switch to mono. Solo the two related tracks.
- Flip the polarity on one channel using the Ø (phi) switch on your channel strip.
- Compare both states. Whichever setting sounds fuller and louder in mono is the correct one. Use that.
- If polarity alone doesn't fix it, use a time-alignment tool (or just sample-nudge the audio) to shift one track by a millisecond at a time until the low-frequency peaks align.
That's it. No processing can compensate for phase cancellation — you have to fix it at the source, before anything else.
If your mix sounds weak or hollow when you switch to mono — if you can feel the energy collapse — you have a phase problem. Fix it before any EQ, compression, or effects work. Nothing else you do will make up for it. Out of every decade of mixing, this is the single piece of advice that has saved the most sessions.
This is one chapter of The Professional Audio Mixing Blueprint
The full book covers 12 chapters — monitoring, gain staging, EQ, compression, reverb and delay, automation, psychoacoustics, modulation and saturation, mixing for genre, and the complete diagnostic protocol I use on every session. Available now on Amazon.