Here's the truth nobody wants to hear: most of the time, when a mix doesn't translate — when it sounds great in your room but falls apart in the car, on headphones, or through a phone speaker — the problem isn't your mixing. It's your monitoring. You can't fix what you can't accurately hear.
I've spent four decades in front of every kind of monitoring system you can imagine, from boutique studio nearfields to massive arena PA rigs to broadcast trucks parked behind venues. The pattern is consistent: engineers who solve monitoring first make better mixes faster, and engineers who skip it spend years frustrated wondering why their work doesn't hold up outside their own room.
The translation trap
Translation is just a fancy word for whether your mix sounds correct across a wide variety of playback systems. A mix that translates well sounds like the same record in your car, on AirPods, on a club PA, and through laptop speakers — different, sure, but recognizably the same song with the same balance and the same emotional intent.
When a mix doesn't translate, the cause is almost always your listening environment, not your decisions. Untreated rooms have their own EQ curves: bass builds up in corners, early reflections from walls colour the high mids, standing waves create dead spots right where your head sits. You end up mixing against your room — boosting frequencies your room is eating, cutting frequencies your room is amplifying. The mix sounds "right" only in that one space.
For my own room, I did three things in order: acoustic treatment on the walls, bass traps in the corners, then room correction using Sonarworks. That's the standard professional setup. None of it is glamorous, but it solves more problems than any plugin ever will.
Buying more or better speakers without addressing room acoustics will not solve translation issues. I've watched engineers spend thousands on monitor upgrades chasing a problem that was always the room. Your monitor is part of a system. The system includes the room. You cannot escape the room.
The five monitoring checks I do before every session
Before I touch a fader, I verify these five physical fundamentals. Getting them right solves something like half of translation issues before any processing happens.
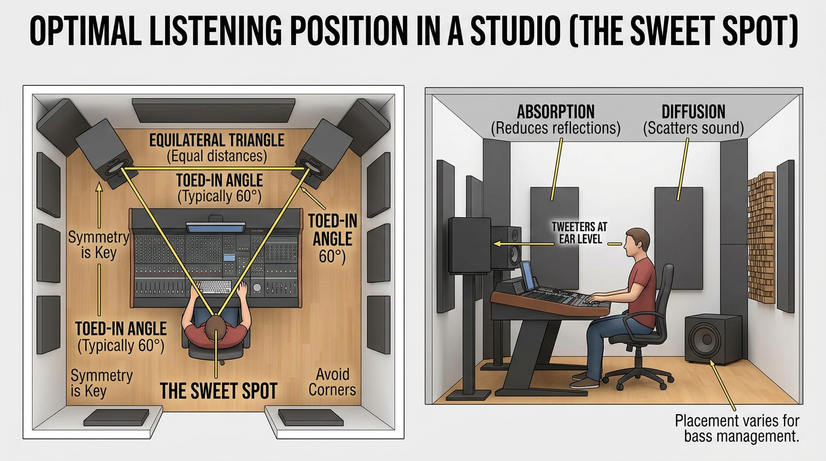
1. The equilateral triangle
You and your two monitors should form an equilateral triangle — three equal sides. The angle between the speakers and your ears should be about 60 degrees. This is the position where the stereo image is most accurate and the speakers' frequency response is flattest at your ear.
If your monitors are too close together, the image collapses. Too far apart and you lose the centre phantom image where your kick, snare, bass, and lead vocal live. Get the triangle right and the rest of your decisions become easier.
2. Tweeter height
Tweeters must be at ear level when you're seated at the mix position. On-axis with the speaker is where the frequency response is flattest. Even a few inches of vertical deviation will significantly colour your high-mid perception — and high-mids are where most of the work in vocals, guitars, and presence happens. This one's easy to fix and most home setups get it wrong.
3. Isolation and wall distance
Use isolation pads or proper stands to decouple your monitors from your desk. If your monitors are sitting directly on the desk surface, the desk becomes part of the speaker — vibrating, smearing low end, adding resonances. Keep the monitors pulled away from front and side walls too. Walls within a foot or two of the back of the monitor will inflate bass and confuse your low-frequency decisions.
4. Calibrated volume
Mix at a consistent, moderate volume — approximately 83 dB SPL, C-weighted, slow response. At this level, the Fletcher-Munson curves are at their flattest, which means your perception of frequency is most accurate. Mixing too loud is one of the most common beginner mistakes I see. High volumes fatigue your ears within an hour, and they skew your perception of bass and highs upward, leading to moves that sound completely wrong at normal playback levels.
A cheap SPL meter (or the free decibel meter app on your phone) is enough to calibrate. Once you've done it a few times, your ear will recognize the right level without metering. But until then, measure it.
5. The mono check — non-negotiable
Your monitoring chain has to include a one-button way to collapse the mix to mono. This is the single most-used button in any professional mix engineer's room. It catches phase problems immediately, reveals balance issues that hide in stereo, and tells you whether your low end will hold up on systems that sum to mono (which includes most club PAs and many phone speakers).
If your monitoring system doesn't have a mono check, fix that today. Most DAWs have a built-in option. There are also dedicated monitor controllers (Mackie Big Knob, SPL Monitor Controllers, the Heritage Audio Baby RAM) that put it on a single button.
The bottom line
A well-set-up room with modest monitors will produce better mixes than a poorly-treated room with expensive speakers. Every time. I've made finished, professional-quality mixes on $300 monitors in treated rooms, and I've heard amateurish-sounding mixes done on $5,000 reference monitors in untreated bedrooms. The room wins.
Invest in your environment before your equipment. Acoustic panels for first reflections, bass traps in the corners, room correction software if you can afford it. After that, almost any reasonable monitor (or even a good pair of headphones for mixing) will give you accurate enough information to make professional decisions.
This is one chapter of The Professional Audio Mixing Blueprint
The full book covers 12 chapters — monitoring, gain staging, EQ, compression, reverb and delay, automation, psychoacoustics, modulation and saturation, mixing for genre, and the complete diagnostic protocol I use on every session. Available now on Amazon.